Translate

Showing posts with label seed beads. Show all posts

Wednesday, June 12, 2013

A Little More Work Last Evening

I was able to sit down for a little while last night, after work, and make a few things. Hope you enjoy:


Fishes & Loaves Asymmetrical Dangles
copper & green seed beads plus the new
way I'm curving in the tails. Seems to work!

Fishes & Loaves Bracelet
Lapis-blue beads (not sure if real or just made to look real)
Copper wire and short bits of necklace chain. I'm going
to play with several designs before I settle on one.

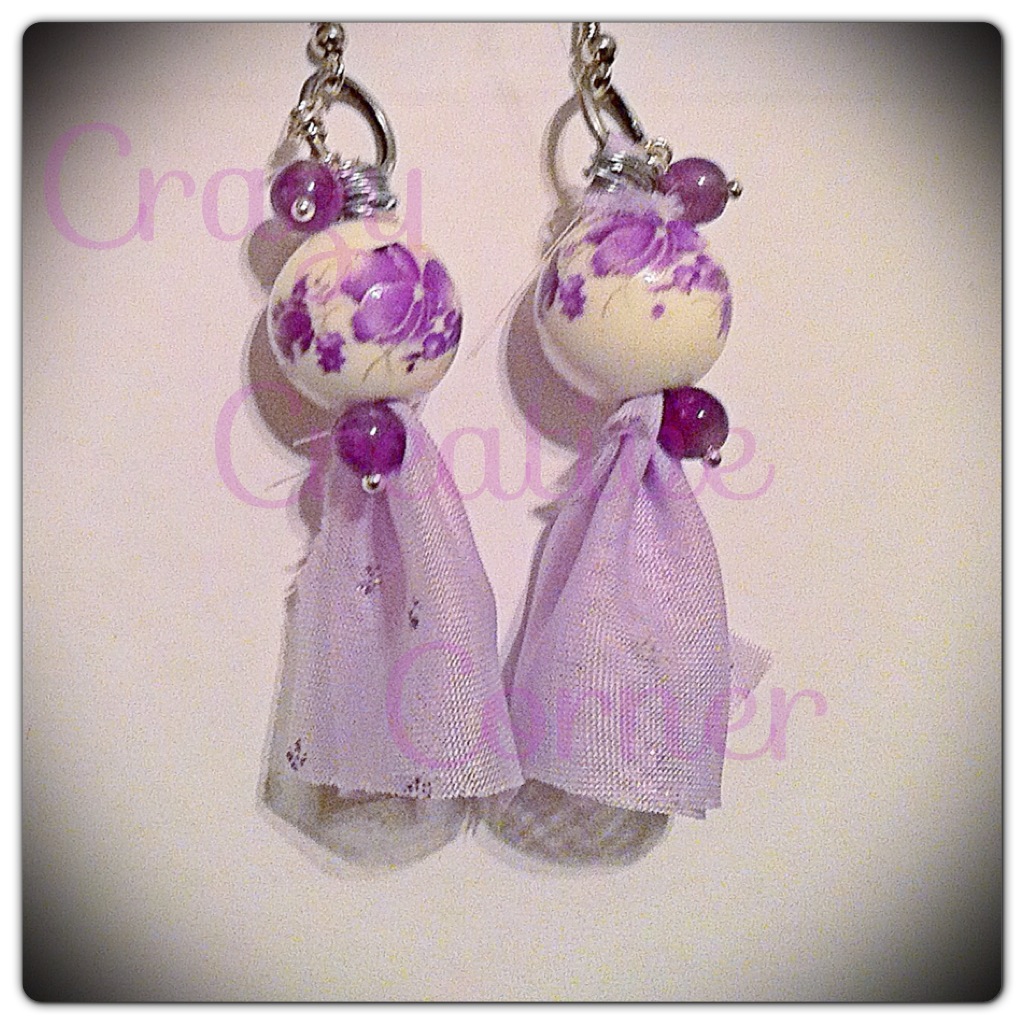
Summer Iris
Again with the earring style learned from
Kristi  Bowman's Aladdin's Lamp earring tute
but using my own little twist. This time I added
a couple beads, top & bottom, as accents and
I used lavender tulle instead of ribbon.
And, for those who want to enter my magazine destash giveaway, go here.

Tuesday, April 16, 2013

A Clean(er) Studio & More Fishes-n-Loaves

I am one who creates in the midst of chaos.  I pull out beads from here, and findings from there, and wire/chain from the other place and just play until a design seems to shape itself.  Sadly, I have a hard time putting the leftovers back where I found them.  I tend to leave them out because, hey, they sparked one idea already they might cause another one!

But, even I finally couldn't take it anymore.  I picked up the bigger pieces, moved things around to get at the smaller pieces, and swept the lot of them into a large bowl I usually have water in to quench my metal work.

Then it sat there, all forlorn, for two days while I worked up the nerve to finish cleaning without stopping to play.  So, here's a few shots of the clean(er) studio:

The "main" area, table with drawers (you can get them
at Lowe's!) and you can see the bits & wood support for my
drill along with various boxes for other equipment underneath.
 
Left side table where some of the mess went until I could rearrange
it better.... it's been further cleaned but it still needs some work.
Let's see, leather roll, beads, findings, brushes, clay carving tools,
barrel for my rock/metal tumbler, pasta maching, notebooks
for inspirational pictures I love, box full of magazines (for a future
destashing contest.... which is coming soon, keep watching!)
 
Bookshelf that's, mostly, used for more bead and
findings stashes as well as other accessories for
beading and metal work. One smaaaall area for
books... 2nd shelf, far left side you can see some
bead books next to the findings stash. Boards
on the side of the shelf for holding earrings and,
on the floor under a book, is my toaster oven for
when I'm brave enough to play with poly-clay.

It's actually even cleaner than what's pictured but I doubt it'll last long! (hahHA!)

After finally getting the worst of it cleaned up (yes, there's still somewhat of a mess there), I sat down and began banging on some washers.  Those are still in the "Come-Along" process and I will show you when they're ready. I will tell you I'm using more beads from Bill @ ZNetShows.com in the design.

BUT!! Since it's not nice to tease, (usually ~snerk~) I will show you some pics of the earrings I made while my metal was tumbling.  I'm still working to refine (and, I hope, expand) my Fishes & Loaves series. Here are the earrings I made this past weekend:


Sorry for the blur on any of the pics. Low light and iPhone cameras don't always cooperate.  My next piece will be (I hope!) a bracelet incorporating the fish sign and the beads. Check back, I'll let you know if it worked ;)

Saturday, November 24, 2012

Copper, Copper, LOVING My Copper!

So, this weekend (starting with Friday afternoon) I got out more of my copper and played with it.  If you want to see the post I did about my first-ever headpins, go here.  If you want to see the post I did for pickle (for cleaning fire-scale from your pins), go here.  I had previously gone to Target and found the cutest little 2qt crock pot for $11.00 and bought it for making my pickle.  Just like you need a dedicated oven with Poly-clay, you need a dedicated pot for your metal pickle.  You never want to use something you would ever consider using at a later date for food.  Always keep these tools separate. 
isn't it just adorbs!?
I also have a pair of long, flat-nosed pliers that I use specifically for firing my copper. 
Look close at the tips, near the arrow, you can see the
fire-scale on the tips. Kobalt is an excellent brand for
working with jewelry. I have two pairs of these pliers,
one for fire work and one for wire work. Available at Lowe's.
I used the 1:1 ratio (1 cup vinegar to 1 tbsp salt, I used Kosher... no reason, just chose it) and heated the crock pot on "High" until it was warmed up then turned it to "Low."  Be aware, this is a sharp smell whenever you open the lid! Once I had balled up several pins and dropped them in the water to cool off, I popped 'em in the pickle for about 15 mintues.  Here's what I got back:

Nice, almost completely clean copper.  What little fire-scale
is left came off easily with my sponge file (which you can
get from you local beauty supply store)
I also got brave and made a few double-ended headpins:

awesome!
then I heated up some bits of copper I had plans to use in making earrings:

The fire-scale is almost completely gone! Only a little elbow
grease with my sponge file and they were ready to be turned
into earring components! by the way, you can look at the blue
arrow in the upper right and see the pickle solution being
absorbed by the paper towel.  It's been used a few times and
is already changing color.  Cool!
My next problem was to turn the rectangles into some sort of earring component. I am determined to make more of my own components. After cleaning the remaining fire-scale, I pounded the rectangles randomly with the peen end of my hammer, with another instrument that I don't remember what it's called but it can be used to make small, round marks/divots in metal and with a .22 shell casing.

Next, I covered over both sides with black permanent marker and, once it dried, sanded it off so only the marks left in the metal were darkened.  Then I punched four holes in them, one at the top and three at the bottom and hung beads and headpins.  Here's the final results:

SQUEE!  I plan to keep these as they're
my first ever pair! aweSOME!
Here are several others I made this weekend, too:
Fishes & Loaves in rustic red:
this pair is just under 2" in length
less rustic & in white: also just about
2" in length... going to make more
pairs on this smaller scale as well as
the 2 1/2-3" length earrings
all together, now.....
snow crystals
ruby zoisite ~ rough

So... that's been my weekend. What about yours?