Translate

Showing posts with label copper. Show all posts

Monday, August 3, 2015

ZNet Shows and On-Line 'Zine

I was able to be creative recently and it's something I haven't been able to do in a long time. First because I had no ideas, no desire, no Muse speaking to me. Second, when I finally felt I was going to hear from my long-absent Muse, I went and broke my ankle (in three places, no less) and had to have surgery on it. I wasn't confident/controlled enough on my crutches to get down into my craft room (even if it was only one step) because, the one time I tried, I lost my balance and fell again (without the same consequences as before, thank God!) so I wasn't about to try until recently.

That said, I was one of the group of designers for ZNet.com asked to participate in designing some jewelry for their upcoming on-line 'zine and received a bunch of lovely beads to work with. Me being me, I made earrings. I love earrings. I think I've mentioned before how much I love earrings because they are so feminine and swing-y. Here's what I managed to create using ZNet's recycled sea-glass beads (and some of my own). Enjoy! )Also, here's the link to the On-Line E'Zine and a link to the sea-glass page on ZNet's web site)
Clockwise from top: Dolphins, teal sea-glass
tubes and sea-foam pearls, light blue starfish
 and baby blue tulip-style beads all of
recycled sea-glass and a few of my own beads.

Top right; black recycled sea glass, multicolored
findings, orange sea glass.
Bottom left; teal sea glass tubes, orange sea glass,
garnet pearls on copper wire.

Top right;  pearls in black, gray, & white with
red sea glass and red crystal accents.
Bottom left; red and blue sea glass, white
pearls, & green crystals.

Top to bottom; two green sea glass squares,
teal sea glass tubes; green sea glass square,
yellow Czech glass squares; green sea glass,
white pearls on copper wire. 
Hope you enjoyed seeing them as much as I enjoyed making them.

(addendum) I wrote this right after I made these and I've since made several more earrings from ZNet's sea glass. I'll post them later.

Friday, April 4, 2014

Firsts - Attempts & Trips

So, I made my first attempt at forging a copper bracelet. I took some 6g copper wire, annealed it (as much as you can with a hand-held butane torch) and hammered the snot out of it (annealing as needed). I then hammered one area slightly wider than the rest so I could stamp words on it. Once that was complete, I worked and worked to bend a bracelet. I learned several things in this 1st attempt:
1) 6g wire is a bear to work with when it starts to harden. Anneal, anneal, anneal!
2) Having some sort of mandrel to curve &/or hammer your bracelet into shape is a must, you just end up with a fairly rough looking bangle otherwise (still, not too horrible, I wear it proudly!).
3) Use block letters to stamp when you want a long word or a sentence. Cutsie letters are fine for single or simple words, but not so much for a whole sentences.
4) It's gonna take time and effort to get what you're after so don't give up. It can be done, just not (usually) on the 1st try.

Here are a few photos of my first attempt:

As you can see, the lettering is hard to read as cutsie swirls. My next attempt will be block letters and I have a few ideas for getting them set where I want instead of just "eyeballing" it.  You can also see how rough the (non-)circle of the bangle is.


Another angle to show the wording and the rough look. I don't mind some "roughness" to my work but I want it to be deliberate, not because I haven't done a good enough job.
HOWEVER!!! In the second pic you'll notice an arrow pointing to a small, soldered area? YES!! I FINALLY WORKED UP THE NERVE TO DO MY FIRST SOLDER JOB!! WOO HOO! You should'a seen me doing the giggly version of the Happy Hamster Dance. Ooooorrrr, maybe not (HA!). ANYwho! I found some no-flux-needed copper solder at Lowe's (in a handy-dandy little syringe-type dispenser) and this is what I used. Obviously it doesn't look copper, but it's apparently for use with copper. I don't care. IT'S MY FIRST JOB! I'll admit, it's a bit rough looking, too, but I STILL DID IT! (giggles ensuing again)  I worked those two ends over until they were fairly smooth in bumping against each other, then I applied the paste and then the flame. This is a low-temp solder so my little butane torch was more than adequate. It did take me a couple of tries or so because I didn't let it heat enough to set (I got nervous) but it's solid, now. I've even tried pulling and tugging that area. Nope! Not coming apart.
So, being of a mind to continue in this vein, I have ordered my 1st mandrel from Amazon and I also ordered a pair of black, bending pliers. Supposedly they are good for shaping heavier metals for rings and bracelets. (yes, I'm afraid I'm a bit tool-mad at times!) If you'd like to see them, follow this link. They looked like a good idea to me so I'll give you a review on them once I've gotten them and tested them out.

Now, about the "& Trips"  part of my title. Saner Sister and I took The Toad on his first road trip over to the coast. We found out the Avila/Pismo area of California is quite pet friendly and, in some cases, beyond welcoming to your furry, four legged friend. The Toad had a ball. Saw his first hotel (Sea Crest in Pismo, for any interested parties, is one of the top places to stay in my opinion), then saw the ocean for the 1st time (wasn't sure what to think of that!) and met several other pooches out enjoying the surf. Wore. Him. OUT!  We also enjoyed eating at The Custom House in Avila. They have a patio area where we were able to sit with The Toad and they even have a PET MENU you can order from for your dog! Saner Sister & I laughed, then stopped laughing and ordered The Toad some hotdog (called "Who Let The Dogs Out") which sent him to Toad Dog Heaven. He was quite spoiled on that trip but he had a blast. Here's a few pics of his time over there:


Not sure what to think of it all. Top left, loved sniffing the kelp!
Center right, his first encounter with a wavelet. He was having
NONE of it! Meeting friends, of course.  Bottom right, watching
crazy humans on surf boards from the pier. Wasn't too crazy
about the pier walk. Wanted off that thing, now!
  
Top left, 1st glimpse of the ocean. Bottom row, having fun
chasing things (birds, waves, other dogs). Middle left,
the look he gave me the day I told him we were getting ready
to go home. Guess he liked getting spoiled being w/Momma
and Saner Sister all day, every day.
(Saner Sister tho't we'd better get in at least one pic w/the Toad, hence the selfie)  So, everyone had fun, The Toad and I got dunked at least once (a wave was higher than we tho't it was going to be) and everyone went home exhausted and happy. Now, back to the routine of the Evil Day Job, walking the Toad (and working on manners, he forgot those with his vacation!), and getting back into the craft room.

Fun.

Friday, February 21, 2014

We're All Ears February Design

Oh, no! I almost (well, I did) forgot about Kristi Bowman's February Earring Challenge! I won't make excuses and I'll apologize that I only have the one photo of my earrings. I decided to go with the Damsel Flys as my buggy inspiration. That, and I'm currently having a crush affair with Ancient Egypt so I decided to try something "scarab-y" looking. I know there was only the faaaaaaaintest touch of yellow in the picture Kristi gave us, but my scarabs (such as they are) have yellow bodies, copper "wings" and flower bead caps for the heads. The blue bead is an accent and because it's the closest thing I have to lapis in my hoard. Go here to check out Kristi's design (and inspiration photo) and see what everyone else has done. (and, next month, I'll try to stay on top of it... and more pics!)

Thursday, January 30, 2014

Thinking....

I did manage to get into my craft studio on Tuesday evening, but I didn't actually get anything done. Oh, I played. I learned that embossing powder won't "melt" onto metal (no matter how close you hold the heat gun) but the powder *will* go everywhere. My own, personal "Color Run" without the run! (hee) I looked at my jewelry clay from Envirotex Lite and pulled out some bezels and pictures to make jewelry... then chickened out... for now! I'll get back to it, I swear! Maybe I'll be braver tonight? If nothing else, I should pull out some of my copper wires and make headpins. I need more and I certainly enjoy the melting and making of them (it's the Pyro in me). So, no pics today, but maybe later? When I screw my courage back up to just jump in and DO IT instead of thinking too much.

Tuesday, January 14, 2014

Keeping the Muse Satisfied


So, I didn't get to play with my poly-clay this weekend. Too much was going on for me to be abl to do it. HOWsomeEVER!  Last night I was able to play with my wire.  Yes, my fellow Crazy Creators, I have made my first ever fibula!  I am SO proud of me right now, I could bust!!

So! I used the bottom of one of my tool holding buckets to create the initial circular shape, then smoothed the shape slightly with my nylon jawed bracelet forming plyers, then hand tightened the circle. I wire wrapped some faceted, Tanzenite colored crystals to the circle, then created the pin and attached more beads. The pin is (it's been suggested) too long so I have plans to lop off about 1/4" and refile the point. Other than that, I'm happy with it.

Now, why did I choose the beads, etc. that I did? Well, there's a story.  I have a series of jewelry called my "Fishes & Loaves" line that is taken from the story in the Bible where Jesus fed the 5,000 with a little boy's donated lunch of five loaves of bread and two small fish. In the past this has mostly been fish-shaped earrings with five beads (3 on one fish & 2 on the other), a couple of bracelets with the fish motif and five beads wired on, and at least one necklace with the fish & beads (which I loved!). This time, I wanted to finish the story. See, after everyone had been fed, Jesus told His disciples to take up the leftovers. They returned with twelve full baskets. Bet that little boy's momma was shocked! (yes, I believe it went to the boy... after all, it was his lunch given to Jesus to use... why wouldn't Jesus reward his generosity?) ANYway, you'll see there's 5 small, purple round beads and two tiny fish on the straight pin. There's the fish & loaves. If you count, you'll find there are 12 beads on the main portion of the fibula... they represent the 12 baskets of leftovers taken up.  The end of the story (as it were).

I'm sure this will evolve in other ways (already have an idea or two) so keep watching.  After all, my Muse is speaking to me, I must keep her happy!

Friday, January 10, 2014

10 Minutes A Day... For Now!


Clockwise from top: amethyst & tanzenite colored,
faceted rondelles, citrine and citrine colored,
faceted rondelles, garnets & emerald colored, faceted
rondelles, moonstone and clear, faceted rondelles.
 I was able to get into my craft room last night for about 10-15 minutes (maybe a little more) and create these four pairs of earrings.  I saw a similar style in one of my jewelry magazines and made my own, slight twist on it. Z didn't let me play for too long (because it wasn't with him!) but at least I appeased the Muse enough that I think she'll return for my next session (which I hope is tonight... I have some ideas I want to get brave and pull out my poly-clay for!)

Thursday, December 26, 2013

Etching Attempts - Pleasing the Muse

So, I have emerged (briefly) from my Creative Exile (aka taking care of a HUGE puppy!) and decided to plunge into trying some etching (pun fully intended).  My 1st attempt was this simple copper marker I etched the word "Sisters" on and some extra whirly-gigs to give it a little extra oomph. I learned two lessons; 1) careful of the amount of "oomph" you add, it can overwhelm what you're trying to do and, 2) remember to marker the sides of your piece so the etchant doesn't eat away at it. (whoops!)
"Sisters" etched copper, high-
lighted with alchohol ink and
the high points sanded.
My 2nd attempt was with some brass casings I have. I learned another lesson here; small spaces such as this need less detail to really stand out. Still, I like what's there. Now I just need to bring out the detail and finish them up (earrings, of course!). I'll post some pics as soon as I have 'em finished.

Here's hoping I can continue to get into my craft room for even some small sessions. My Muse is threatening to go into hiding if I don't do more!

Brass shell casings etched - learning process in action
...and, suddenly, puppy!

Staring at my Mom eating waffles. He
didn't want to chance missing the offer
of some peanutbutter... notice how his
eye level is above the counter top?


Helping his Momma feel better on a sick day


Monday, June 24, 2013

To Etch or Not To Etch.... To Etch, Of Course!

MG Chemicals 415 Ferric Chloride Liquid, 1 Liter Bottle, Dark Brown

MG Chemicals 415 Ferric Chloride Liquid, 1 Liter Bottle, Dark Brown from Amazon.com

This is my latest acquisition. Yes, I'm going to take the next step in my metal work and attempt etching. We'll see how it goes.  I have all sorts of plans but you know what they say about "the best laid plans of mice and men..."  I know, not a mouse or a man but, still....

We'll see.... And so will you, I promise.

As for the magazines that were offered in the prior post... only three peeps made a comment, so The Magic Frog made a unilateral decision and decided all three will win.  Will Debb of Forget me Knot Nonsense, Saraccino, and Zan Caperton please email me at thecrazycreativecorner@gmail.com with your snail mail addys?  I'll get each of you a package of 'zines in the mail ASAP once I know where to send them.

Keep watching, folks. I'm not kidding when I say I'm planning a 'zine destash give-away. You never know WHAT that crazy Magic Frog will pull out of his hat!

Monday, June 10, 2013

Gifts & A Give Away

I'm afraid I'm not doing much in my studio right now. It's beyond hot. Granted, we don't have the nigh-on 100% humidity some of y'all suffer from, but trying to work out there, even with the little air unit running, is not fun.  But, I did manage to get a birthday gift for a friend and a pair of earrings for another friend made.
For some reason, I had a huge brain fart and could NOT
get this pendent to come together. Looks simple, no?
NO!! (well, it probably is, but I couldn't make it work
at first!)  She loved it, by the way.
 
Another pair of earrings based on the tutorial by
Kristi Bowman (mentioned in this post)

 And now, the "Give Away" part.  Yes, I have more magazines to destash (more, even, than I'm giving away right now.)  Here's what you get:
...and here's the rules:
1. post a link to my blog on your FB or blog page showing this giveaway
2. share the link here so I can see it
3. tell me what sort of jewelry you'd make if you were inspired by watching Duck Dynasty

... * ...

Wait.  What?

Yep! I want to know what piece of jewelry you'd make for one of the folks on Duck Dynasty.  If you're feeling really competitive (or inspired) you can make a piece and share the link in the comments here. If you do, it won't add to your chances of winning, I just wanted to see if you were paying attention to the rules.

And, if you'd do it. :P

Tuesday, May 28, 2013

What I Did & Didn't Do This Weekend

You know how you lay plans for your day (or weekend, as the case may be) and have every intention of sticking to that plan? Come High Water or Unexpected Guests!!  Well... there comes a time (or three or a dozen) in every creative persons crafty life when they sit down in their studio and all intentions and plans go right out the window and they end up doing something entirely different.

This weekend was one of those times for me. I had every intent of getting to know my new Jewelers Saw (and probably several blades) over the holiday weekend (which, pause... Thank You, again, to all our Service members, past present and future. I truly, deeply appreciate all of you...) but, when I was sitting, doodling in my notebook a day or so before the weekend, an idea for a bracelet I'd been trying to figure out popped into my head. Along with a necklace. I doodled and played and, yes! the idea would definitely work! So, instead of sawing metal, I was clipping wire.

I started by practicing with my 18g steel wire (because, honestly, that's SO much less expensive than my copper wire!) in order to figure out length for each piece and the size of the loops I would need.  The rough wire practice actually worked, so I pulled out the copper in 12 & 14g and went to work. And here are the results of that work:

The bracelet... recycle sari ribbon, yellow crystal rondelles,
and 18g copper wire to hold the ribbon. It's bangle-style.
 
The "front" of the bangle. This was taken with my iPhone
and Instaframe would not let me put both fish in the picture.
Rest assured, the right side is a mirror image of the left. I
went with bangle instead of cuff or even a catch so that
the wire wouldn't catch on anything.  Curling the tales of
the fish was a epiphany I had while doodling and made it
easy to attach the fish to the bangle but not get in the way.
 
The necklace! OOOOHHH! I about giggled when this idea
doodled itself out. It has the look of an old-fashioned
fishing net (such as would have been used in Bible times)
and just make the necklace really work. 

 
Of course, if you follow my blog, you know I can't make
other jewelry without making earrings. I can always make
earrings and stop, but I can never make anything else and
not make earrings. Never have figured out why. Except that
I'm just weird that way ;)

As you can see from both the bracelet & necklace, curling the fish tails in makes attachment to anything else (or each other) relatively simple. I'm keeping this set but I can now make more. I also think the steel wire might look good as the necklace and may try that next.  I'm really liking this so the poor saw may just have to wait a little longer ;)

Thursday, May 9, 2013

Diamonds In The Rough Jewelry Challenge ~ ACCEPTED!

So, as I've mentioned briefly in previous posts, Bill @ ZnetShows asked me to join Round Two of their jewelry design challenge and they called it Diamonds In The Rough.  Don't know if that's aimed at me or not... (kidding!)  Of course, he sent pictures of the Adorable Abby to lure us all in. I mean, really, who could say "no" to that face!?  Not me!  Not to mention the chance to play with more free beads! So, of COURSE, I said "yes" to Round Two. They will be voting on their FB Page so check them out there and vote for your favs (of which I hope I'm one). 
ZnetShows is a wholesale bead-porium and you can click on the link to go take a look at their plethora of gorgeous beads. But, check out their FB page 1st because, I promise, you'll be in bead-porn heaven if you go to their wholesale site first and you'll sit there forEVer before moving on. Not to mention the buying that will happen!
Anyway, here are my entries:


The Beads I started with... aren't they
just SCRUM-dilly-UMPTIOUS!?
    

Tribal Necklace - coins and chime dangles are from my stash
beads and focal bead are from ZnetShows...
 
The beads used from ZNetShows for this necklace are:
Freeform, heat treated carnelian pendent (I've lost the item code for this one, I apologize)
Fire agate rondelles in dyed yellow/green color - item code (BDS1593-09)
Tiger's Eye round beads - item code (BDG58-08)

used the tiger's eye and dyed fire agate from ZnetShows
and the chime charms from my own stash

Hidden Tiger
I cut out and filed/sanded the metal forms and used ZnetShows Tiger's Eye beads for the bracelet.
Morrocan Adventure
For these, the chime dangles are from my stash and the squares are from Znet - red square aventurine and their item code is (BDG44-13A)

What can I say? I'm into the tribal style right now.
For these, I hammered out copper pennies and used Znet's red aventurine squares and tiger's eye rounds, then added a touch of radiance by adding in their opalescent glass quartz oval puffed beads and their item code is (BDG46-55)


Jangling Jade
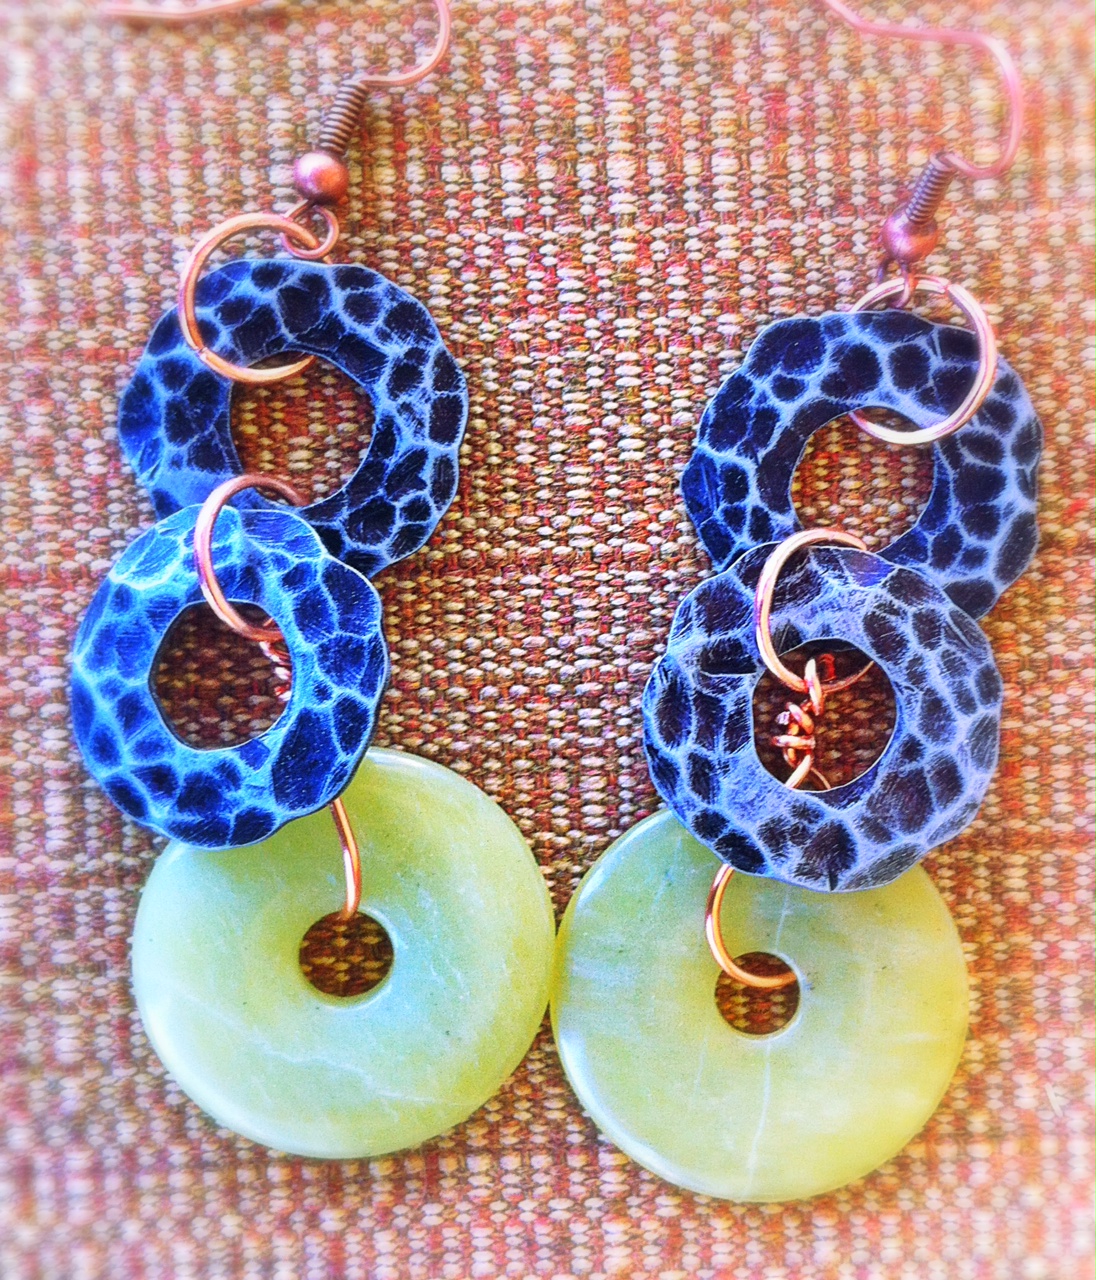
The metal donuts are washers I beat the b'jabbers out of, colored with black permanent marker, sanded to bring out the high points and sealed. The gorgeous olive jade donuts are from Znet and their item code is (BDG118-17D)

Autumn Desire (I know, it's Spring going into Summer,
but I happen to love Autumn!)
The pendent is a washer I treated the same way as the earrings I described above, the light colored rounds are composite marble from Michael's and the heat treated carnelian pendent is from Znet (sorry, as I said, lost the item code for the carnelian *sigh*). The red aventurine squares are also from ZnetShows. The clasp I found/bought at Joanne's from the sewing/button section. Awesome!

Gypsy Fire
Again, hammered the b'jabbers out of copper pennies and the chime dangles are from my stash. The red rectangles are rectangular, aventurine puff beads from Znet - item code (BDG43-13)

As I said, go vote on Znet's FB page and, then, go explore their wholesale bead site. They've got some YUMMY beads that will keep you drooling and checking your pocketbook for spare change!

Tuesday, May 7, 2013

After Being Gibbs-Slapped By My Alter Ego....

In my previous post (here) I showed pictures of several pairs of earrings and asked what you thought about which should be worn by my Alter Ego, Zarqa Habiba, to the So-Cal Renaissance Faire.  This is the necklace that she was going to be wearing:
Full view: ended up wearing it without the carnelian
pendent there. It was too long for my neckline and
I'm of a fairly modest persuasion. Still, love the look.
Yellow rondelles are rough, yellow fire agates. Awesome!
 
A detail look.
Beads from ZnetShows.com, dangles and coins from
my stash. Bells were reused from a pair of Middle
Eastern chiming anklets.

 
Another detail shot.

 I was still contemplating which set of aforementioned earrings would work with this necklace when Zarqa gave me a disgusted look and Gibbs-slapped me!  Of COURSE!  Earrings should always match the necklace. DUH! (sigh)  So, I made these (and Zarqa was pleased):


They, and the necklace, chimed sweetly at the Faire and many people liked them.  And, since I was in an earring making mood, I threw in one more pair Because I Could!

Not sure what type, but the stone is agate (I think)
The metal was bought from Michael's pre-stamped
and I just cut out the shape. Bronze 1/2 circles and
copper wire. Warm, dangling goodness.
There will be another post later this week for ZnetShows and the beady goodness they've been letting me play with.  Check back, I'll have pics and links for you to check out. They've got AWEsome stuff!

Wednesday, May 1, 2013

Working Toward The Faire

I attend the Southern California Renaissance Faire with Friends every year and it's a blast! What makes it even more fun is to come up with what I call an "alter ego" and dress as that character for the day. I've mentioned mine before, Zarqa Habiba (Persian for Blue Eyed Friend) and you can see her here.  Whelp! I've been going over her outfit and re-working it a little bit for this year (still wearing the tats!) and some of that re-work has been her jewelry.  I've been working on a necklace with beads I received from Bill at ZnetShows.com.  It's not done, yet, but it's close (which, it better be since we're going this Saturday!) so here are some pics for you to enjoy.

Beginnings... we all have to start somewhere!


Closer to finished: stamped and colored the metal.
The yellow/green-y rondells are (I'm told by Bill at
Znet) Fire Agate! Who knew they came in yellow/green!?
I always thought they were carnelian/red and white!
Awesome!

Detail shot: the Christian fish symbol, swirls and twirls
I also dangled tiny bells like those worn by Middle
Eastern dancers. A lovely chime-y sound :)

Now we get to the hard part.  The earrings.  I've made a number over the last week and Zarqa is beside herself to choose a new pair for Saturday.  They're all fairly long (juuuuuuust shy of brushing her shoulders, but she doesn't have a long, swan-like neck, either) but they have that tribal feel she's loving.  Take a look and give her your vote?


So, that's it for today. Photos from the Faire Day will make their way on here eventually so you can see which earrings Zarqa finally settled on.

Friday, April 19, 2013

Done!

Okay, so I finished the necklace last night and I learned a few things:
1) Just because someone says "use fixative spray to set" does NOT mean it works for everything (or else I just have a very heavy hand and don't know it)
2) I will, from now on, let "permanent" marker ink cure/set for 24 hours, then rub it with Renaissance Wax to "fix" it in place.

Honestly, I followed directions on the can for the fixative. I even let it dry for 20 minutes instead of the 15 required. Then, I do what I always do to be sure, I rubbed my thumb (rather hard) over the surface and the "permanent" marker that had just been "fixed" by the spray came off on my thumb.

~DRAMATIC SIGH~

Out comes the Renaissance Wax and to (careful) work I go. In a short time, not only is the whole thing coated, but none of the marker ink came off during the process or after a few hard rubs of the thumb. Since it has in the past, I attribute this to letting the ink set overnight (NOT the "fixative").  As a test, I inked up four more hammered washers and left them overnight.  I plan to test them by waxing one (carefully) and seeing if the ink stays put. If so, yay. If not, then it's a combo of the "fixative" and the wax. Fun.

Anyway, here's the finished necklace:
Full view - haven't decided on a title, yet.
Free form carnelian pendent & heat treated red aventurine
squares are from ZNetshows.com.  Marble composite circles
are from Michael's, donut focal is a (former) washer from Lowe's
and the clasp is from the button aisle at Joanne's Craft Store.
 
Closer look at the beads

 
Closer look at the focal....
 
...and at the clasp.
I had no real design in mind when I started this. I just hammered away at the washer to start with. When it was done, and I recalled I need to finish some designs for ZNet Shows, I just felt drawn to the ruddy red-ish, orange-ish color in the carnelian and aventurine. It didn't seem like enough, though, so I dug through my stash until I found the marble composite beads. They're a pink-ish white/cream color with the ruddy red-ish, orange-ish color of the ZNet beads.  It was perfect, and their shape echoed the chain and washer.  I'll be sending a photo of the design to Bill Zhang shortly.  I have more designs to work on, but I don't want him to think I'm not working with the gorgeous beads he's sent me.


Now, moving on slightly, I also tried my hand at turning my Fishes & Loaves earring series into a bracelet. It worked, and it didn't. Here's the (mostly) finished product:

I got the five beads on for the loaves, four wired to the bracelet and one as a dangle by the fish's tail but I was only able to get one fish (the clasp).  I need to find a way to add the second fish or it won't be right.  I'm also a little worried that there are "snag" trap areas so I think it requires a bit more tweaking. I plan to wear it a few times with various outfits to see if it does snag.  Any suggestion will be gratefully received and, likely, tested out.  All in all, not completely disappointed in this for a first attempt. Will be checking the tutes I've pinned and bookmarked for bracelet making to see what I can tweak.

And now, off to email Bill.